We last talked about Priority cleanup an year ago, back when we explored how the newly introduced support for overriding a retention policy stamped on files stored in SharePoint Online and OneDrive for Business works. One of the things we noted back then was the difference in behavior compared to Exchange Online – items deleted due to the effect of a Priority cleanup policy in SPO/ODFB were “soft deleted”, as in moved to the Recycle bin. In contrast, deletion due to Policy cleanup for EXO items is permanent.
Since then, Microsoft has developed and released a configuration setting that allows us to control the deletion behavior. Said feature is now rolled out completely and should be available in your tenant. For reference, the corresponding Roadmap item is #557188, and its description reads:
Admins will be able to select hard delete configuration while setting up a priority cleanup policy for OneDrive and SharePoint content and skip recycle bins.
To access this new hard delete option, navigate to the Purview compliance portal and select the Data Lifecycle Management solution, then click Priority cleanup (preview) from the navigation bar. Select any existing Priority cleanup policy to edit its properties, or create a new one. Configure the Name and description, Locations and Conditions settings as needed (or just hit the Next button few times if working with existing policy). For a policy that has been scoped to SharePoint Online and/or OneDrive for Business locations, a new checkbox will be available, as shown on the screenshot below:
 While we can argue about the language used here, the important thing to know is that this is indeed the setting that controls the “hard delete” behavior for the given Priority cleanup policy. If you leave it unchecked, the “standard” behavior of moving any item matched by the policy to the Recycle bin applies. If you enable the Delete data permanently checkbox, cleanup will bypass the Recycle bin altogether, effectively hard deleting any matching items, without a recovery option. Microsoft will warn you one more time, via a modal dialog popping out once you hit the Next button:
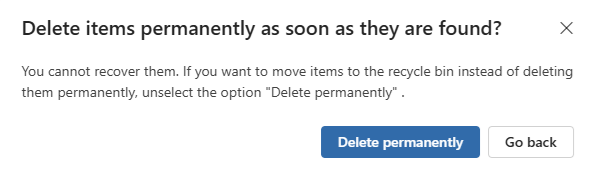 Again, don’t mind the wording here (and the fact that the actual setting name is misspelled). Confirm that this is the desired behavior by hitting the Delete permanently button, then proceed with the rest of the Priority cleanup configuration steps. Here is a good place to mention that the setting is indeed toggled on a per-policy basis, which gives you some flexibility. For any additional details on the process of configuring a Priority cleanup policy, refer to the official documentation.
Now that we know how to configure hard delete behavior for a Priority cleanup policy, we might as well discuss how it works on the backend. As we discussed in our original coverage of Priority cleanup, there are three building blocks: a policy object, which can be managed via the set of *-RetentionCompliancePolicy cmdlets, a corresponding rule object, manageable via the set of *-RetentionComplianceRule cmdlets, and a compliance tag, manageable via the *-ComplianceTag cmdlets. For each of these cmdlets, the -PriorityCleanup switch must be used, as they cover regular retention functionality in addition to the Priority cleanup feature.
As the policy object covers “generic” settings, such as locations and approval workflow, you will not find anything relevant to the “hard delete” setting therein. The same applies to the rule object, which in turn controls the content query. We do have a RetentionComplianceAction property available as part of the rule metadata, but said property does not control whether a “soft delete” or “hard delete” behavior will be used (you still need to set the value to Delete though). The rule also contains information about the compliance tag linked to the policy, which is where we will find the setting in question.
The example below showcases how you can use the Get-ComplianceTag to check whether a given tag (and its corresponding Priority cleanup policy) is configured to use the hard delete behavior. To be more specific, the corresponding property name is IsHardDeleteInSPOandODB and it takes Boolean values. The second example shows how you can toggle the value of the IsHardDeleteInSPOandODB property, and thus control the hard delete behavior for a given Priority cleanup policy. Do note that you must use the switch in all examples, without it an error will be thrown.
#Check the properties of a given compliance tag
Get-ComplianceTag xxxxxxxx-xxxx-xxxx-xxxx-xxxxxxxxxxxx -PriorityCleanup | select Retention*, IsHardDeleteInSPOandODB, Policy

RetentionAction         : Delete
RetentionType           : CreationAgeInDays
RetentionDuration       : -1
IsHardDeleteInSPOandODB : True
Policy                  : xxxxxxxx-xxxx-xxxx-xxxx-xxxxxxxxxxxx

#Toggle the value of the property IsHardDeleteInSPOandODB
Set-ComplianceTag xxxxxxxx-xxxx-xxxx-xxxx-xxxxxxxxxxxx -PriorityCleanup -IsHardDeleteInSPOandODB $true

WARNING: IsHardDeleteInSPOandODB option is currently supported for OneDrive and SharePoint only. Setting IsHardDeleteInSPOandODB to true in the label configuration will permanently delete the labelled items in OneDrive and SharePoint without a recovery mechanism.
Just like when using the UI, you will get a warning when toggling IsHardDeleteInSPOandODB to True. It goes without saying that you should only do so if you fully understand the consequences. Then again, the same applies to Priority cleanup as a whole, this is a feature that must be used only as a last resort and only by people with strong understanding of how it all works and what the potential implications are.